lead free soldering
Purpose: To be able to teach kids how to solder, using lead free solder and materials with low toxicity or other health risks for safer handling.
This is not meant as a guide for professional soldering, since leaded solder is currently (2023) still unmatched in terms of both quality of solder results as well as ease of handling. Even for adult beginners I still recommend using leaded solder (if you can get your hands on any, since they have mostly been removed from the private market).
Introduction & Basics
The following guide is intended for experienced people with advanced soldering skills, who would like to learn how to solder lead free and also teach kids or others. With underage teens & kids being the main target group, the products I recommend have been selected with a focus on health aspects (low toxicity and safety in handling), acceptable costs (non-professional equipment) and teachability.
Of course this guide can also be used by beginner adults to learn how to solder lead free. However, I must note that lead free soldering is much more difficult if you're lacking both experience and knowledge. It is difficult to judge the success of your lead free soldering if you don't know what a good solder joint should look and "feel" like while soldering. This is much easier to learn with leaded solder. Since leaded solder has basically been removed from the market and is only available to professionals and companies, beginners will be forced to use lead free solder.
If you're a beginner who wants to learn how to solder, please be aware that it might be necessary to get help from someone with advanced experience.
Speaking of experience, professionally I am surrounded by both hobbyist and professional solderers, yet most people seem to have little to no experience with lead free soldering (thanks for the one person who gave me the tip about using liquid flux!). Lead-free soldering is extremely unpopular and I have found that there is a severe lack of knowledge on the subject.
I have started to research this topic in order to be able to teach kids in our student lab of the institute I work at. The target group is kids and we wanted to satisfy high professional standards in terms of quality and especially safety. Note that for most products it is recommended in the datasheets to use rubber gloves and eye protection for safety.
Soldering Basics
If you're here to teach yourself how to solder, please put in some extra time for reading and researching the topic on the internet. Here are some simplified(!) basics you need to understand:
- Soldering is connecting two metallic parts both mechanically and electrically. Unlike welding, the metals do not melt themselves, instead another metal alloy (solder wire) with a low melting point is added to connect the pieces together (much like "glue").
- Soldering temperatures at the tip of the iron typically lie between 300°-400°C and are applied using a soldering iron.
- Modern solder nowadays contains flux in the core of the wire, making it very easy to use.
- Flux is a helper material that will remove oxidation on the surfaces of the metals. Oxidisation is problematic, because it will prevent the heat from the soldering iron to be transferred into the electrical components and prevent the metals from connecting with one another. Flux will help remove oxidisation and therefore enables the heat to enter the metals. Without flux soldering is almost impossible.
- Flux will also evaporate at typical soldering temperatures (300°-400°C), where the higher the temperature the quicker the flux will burn or evaporate. Therefore the soldering job should be finished by the time the flux has disappeared. Lead-free solder requires higher soldering temperatures, which means the flux will disappear more quickly than with leaded solder. Therefore soldering has become a little more difficult.
- When flux is heated it will release smoke. There is a wide variety of different fluxes with different properties. Generally speaking the main health hazard comes from the soldering smoke (the flux). Lead-free solder typically requires flux that is more toxic than the flux used in leaded solder, making lead-free solder more environmentally friendly but also a bigger health hazard (heavily depends on the products used!).
- There are VOC-free and halogen-free fluxes available also for lead-free solder, making them less of a risk factor. They do create less smoke but also leave sticky residue behind.
- There are so called "no-clean" fluxes that leave almost invisible and non-corrosive residues on the solder joint environment. Make sure to either use solder wire with "no-clean" flux, or buy an appropriate flux residue remover for your solder wire.
... no, I'm not done yet, there's more:
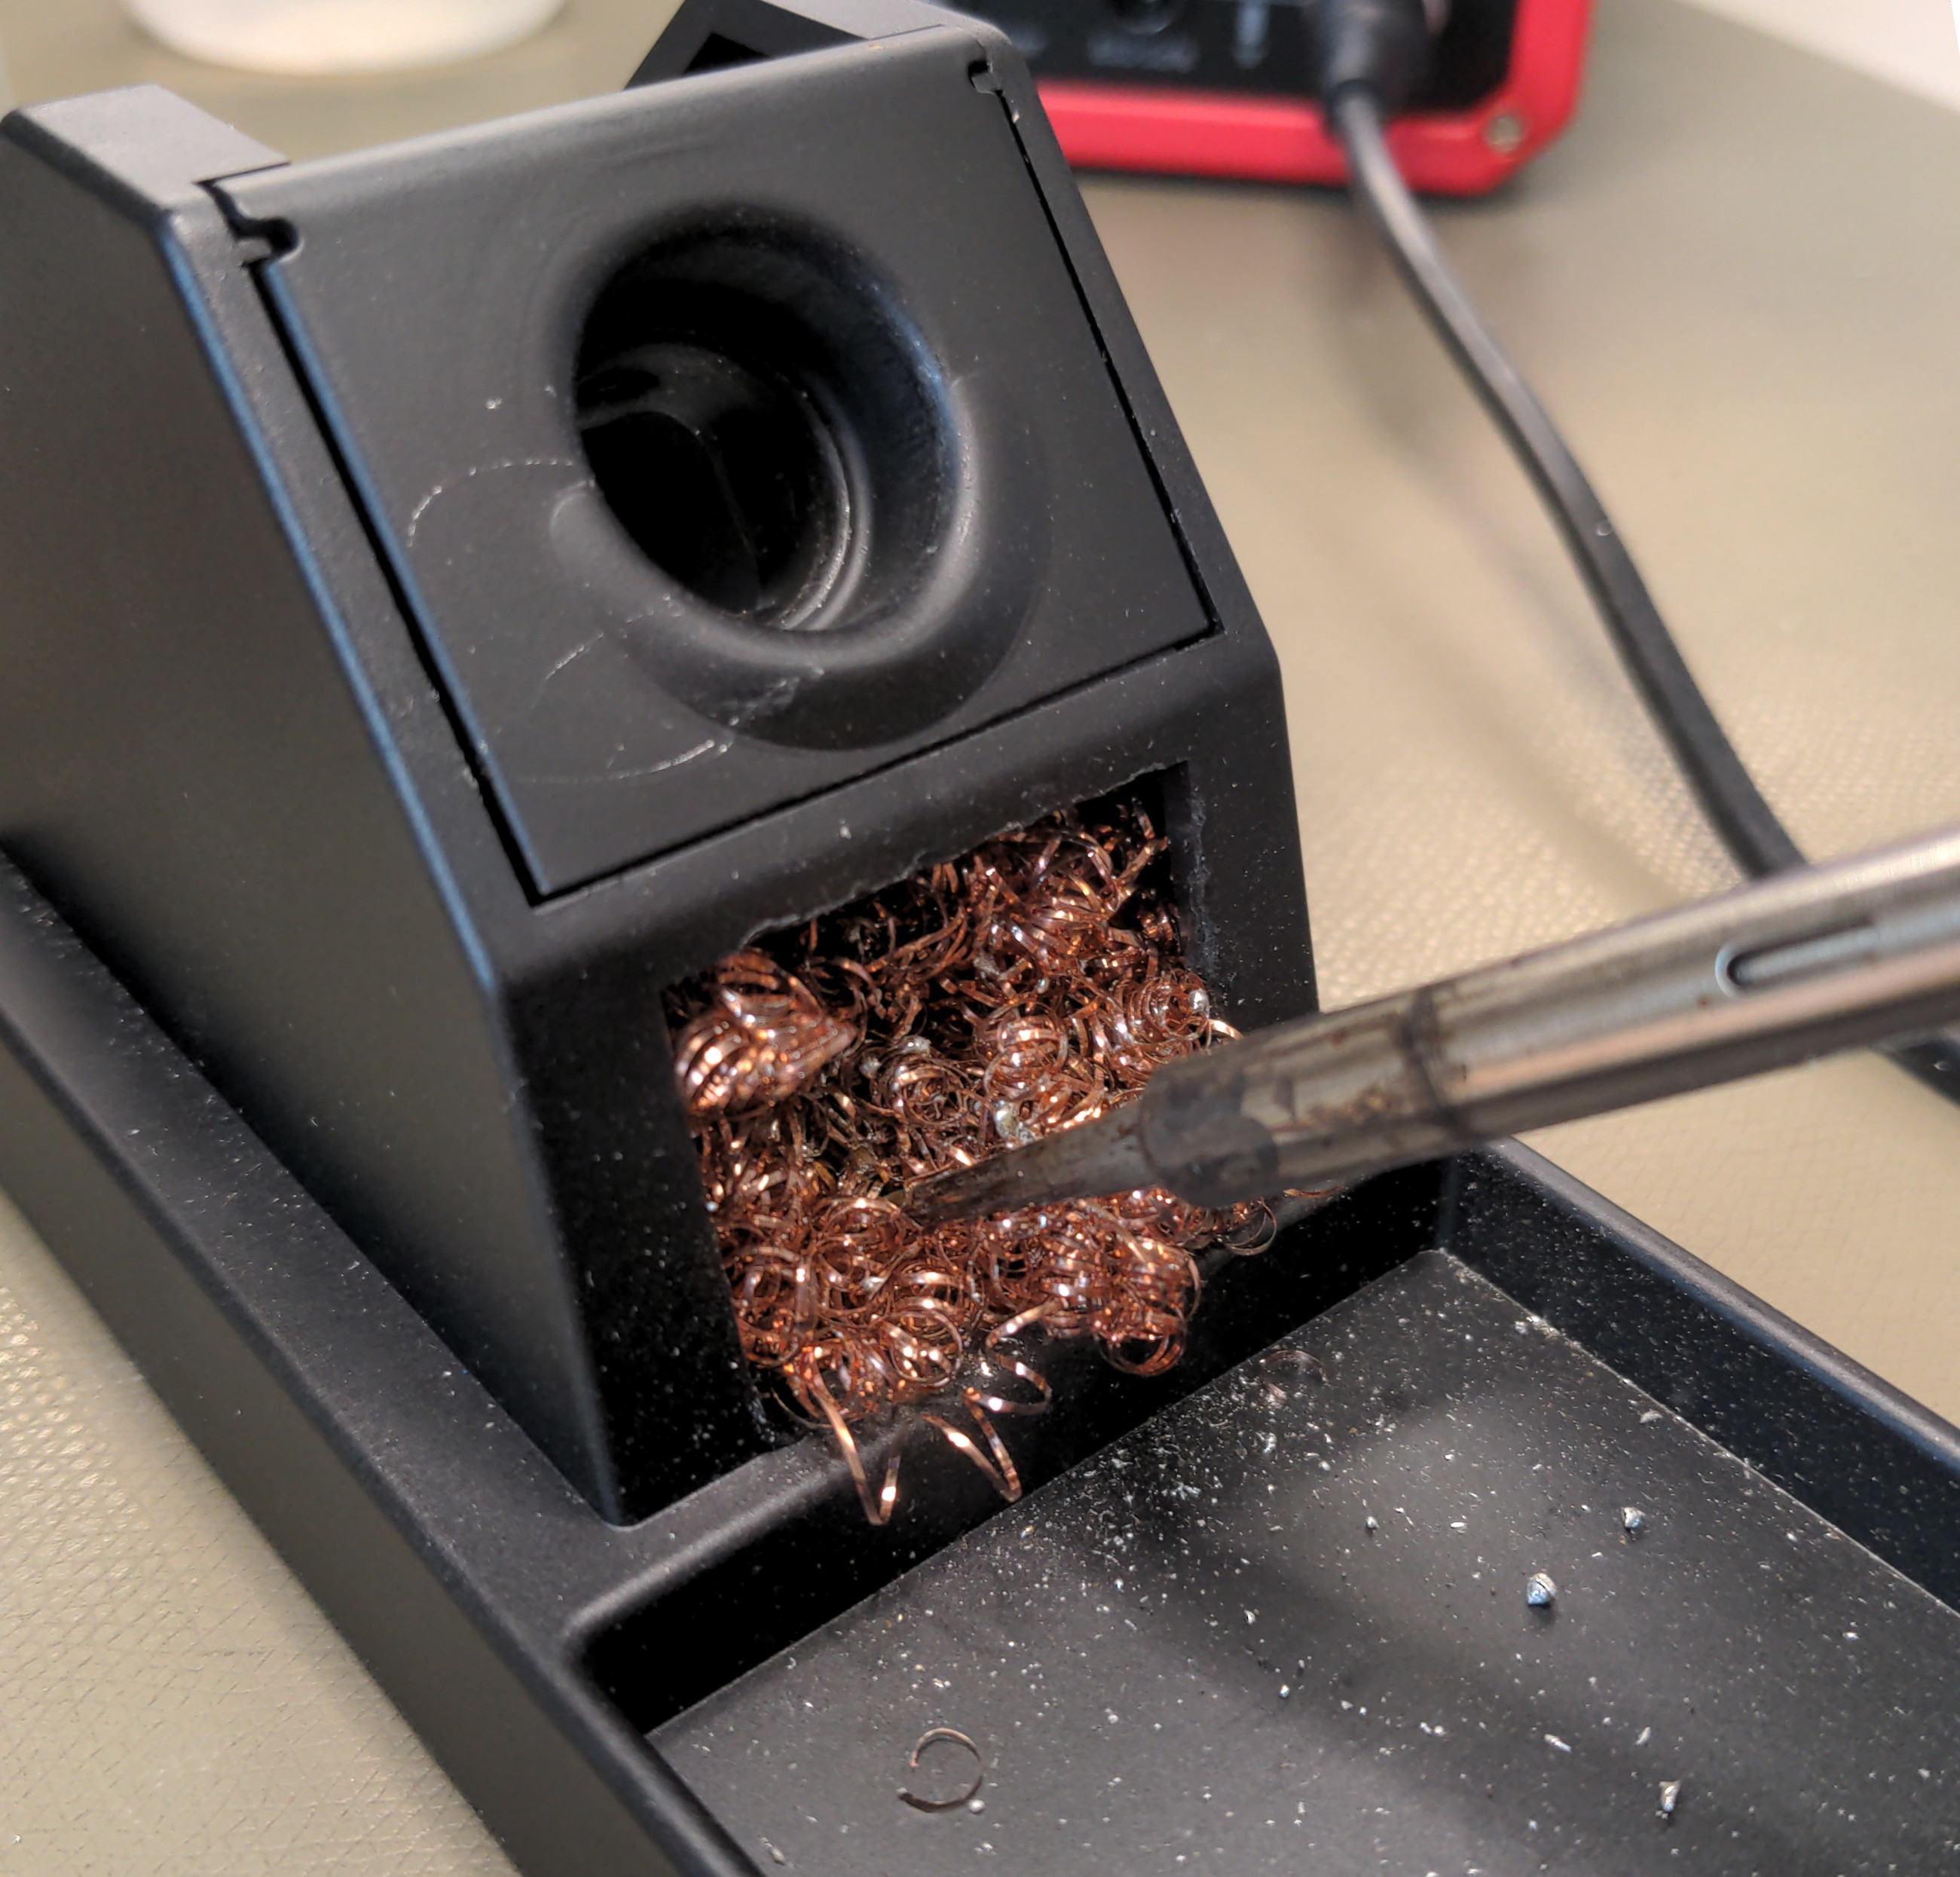
- Many people are used to using wet sponges to clean their solder tips. Some beginners don't even know you're supposed to wet the sponge and instead actually burn the sponge with their iron. Wet sponges cause mechanical stress to the iron due to the big and sudden temperature drop from above 300°-400°C down to 100°C. Please don't use wet sponges. Use so called "dry sponges" that look like metallic wool ("Reinigungswolle").
- A dull looking or dark/brown/black soldering iron tip is not usable. It is heavily oxidised and needs cleaning. Sometimes tinning the tip multiple times fixes the issue, but if this doesn't solve the problem you either need to get a special cleaning product or exchange the tip for a new one. This problem can be avoided by taking good care of your tip, not leaving it running unused at high temperatures and regularly tinning the tip. Switch it off when you're done and use a standby temperature when currently not in use.
- A so called cold solder joint ("kalte Lötstelle") happens when solder sits on top of the metals it is supposed to connect to, but it didn't connect. Enough flux, heat and time will cause the solder not only to melt but also to "flow". When it flows it will visibly "creep" along the metals and the surfaces will properly connect to one another. A good solder joint look shiny with a smooth surface, a cold solder joint is dull and rugged.
- Fresh air and an air filter is advisable for health reasons, but please be aware that cold airflow should never be present at the soldering area. Filter the air >above< the work area. Cold airflow will cool down the parts to be soldered, meaning it will counteract the heat you are trying to introduce into the metals.
... there is still more to know about soldering, but this should get you started :-)
Leaded Solder Wire
While lead is a heavy metal and is a concern for both the environment and our health, it is worth noting a few things.
- Professional soldering on a large scale using automated equipment is an easy to control environment. It is therefore both feasible and absolutely necessary to use lead free solder for environmental long term reasons.
- Soldering by hand is only a tiny fraction of all the soldering happening world wide. Given how little most people solder per year (even professionally), my personal opinion is using leaded solder is justifiable for private/personal purposes. On a professional level there are laws mostly prohibiting the use of lead [1] [2]. Note that using leaded solder with kids is prohibited in Germany.
- There is little to no lead that enters the human body while soldering neither by breathing in fumes nor by touching it with (unbroken) skin. But please don't stick solder wire into wounds or your mouth ;-)
- Measurable lead contamination shown in blood levels stem from a lack of hygiene. People often touch solder wire and then touch their face/mouth/eyes, which is how lead enters the body. Don't touch your face or food while working and always wash your hands with soap when you're done.
- Using lead in jewellery is prohibited... don't solder LED-earrings with lead! [1]
- Lead will harm your fertility [1] [2].
- Typically the flux and it's fumes are a bigger health risk than lead, provided you wash your hands and watch your personal hygiene. Use a fume extractor for the fumes.
- Fumes will be carcinogenic and allergy inducing.
Sources (in German): [1] TRGS 505 [2] DGUV Information 213-714
Blei und seine Verbindungen sind als reproduktionstoxisch Kategorie 1 A eingestuft. Dies bedeutet, dass Blei und Bleiverbindungen beim Menschen bekanntermaßen fruchtschädigend (entwicklungsschädigend) wirken (RD1 A) und wegen ihrer möglichen Beeinträchtigung der Fortpflanzungsfähigkeit des Menschen Anlass zur Besorgnis geben (H360FD, bzw. H360Df). Auch bei Einhaltung des Beurteilungsmaßstabes kann eine Fruchtschädigung bei einer Exposition Schwangerer nicht ausgeschlossen werden (siehe dazu auch Nr. 6.3).
[...]
Die im Rahmen einer umfangreichen arbeitsmedizinischen Studie gewonnenen Messergebnisse zeigen jedoch, dass sich die Blutbleiwerte von Kolbenlötern nicht von denen der Allgemeinbevölkerung unterscheiden.
[...]
Ein Unternehmen hat auf der Grundlage des Ergebnisses der Substitutionsprüfung nach GefStoffV vorrangig eine Substitution durchzuführen und dadurch die Gefährdungen der Gesundheit und der Sicherheit der Beschäftigten bei Tätigkeiten mit Gefahrstoffen auszuschließen. Es hat Gefahrstoffe oder Verfahren durch Stoffe, Gemische oder Erzeugnisse oder Verfahren zu ersetzen, die unter den jeweiligen Verwendungsbedingungen für die Gesundheit und Sicherheit der Beschäftigten weniger gefährlich sind. Ist dies nicht möglich, hat es die Gefährdung auf eine Minimum zu reduzieren.
Working with Kids in Germany
A note on the legal aspects when soldering with underage kids in Germany: This source states on pages 48-49 that soft soldering ("Weichlöten") can be taught to kids from the age of approx. 10 years and up (or when equivalent knowledge is given), where regular room ventilation is defined as sufficient (I disagree, please use fume extractors!) and only lead-free solder may be used. Kids approx 10-12 yrs may work partially independently, ages above may work independently... provided they have received proper safety and operating instructions. More details about soldering and working with electronics can be found on page 128.
An Schulen dürfen die üblichen Lötarbeiten (Weichlöten) durchgeführt werden. Hierfür reicht in der Regel die natürliche Raumlüftung (Fensterlüftung) aus. Es dürfen nur bleifreie Lote eingesetzt werden (siehe II – 5.6).
Bleihaltiges Lot darf nach der EG-Richtline 2002/95 (RoHS-Richtlinie) nicht mehr verwendet werden.
TL,DR; Lead-Free Soldering Quick Guide for Hobbyists
Read the more in depth explanations below for how I came up with these recommendations.
Tool Recommendations
Disclaimer: Most links I provide link to conrad.de, because of its accessibility to private customers. I do not endorse the shop and most products can be found cheaper on ebay.de or other sources.
Soldering Station
For private or hobby purposes I recommend using a soldering station that can be set to at least 450°C, ideally with enough wattage (e.g. 100W or more) to heat up the iron quickly. The working temperature should always be below 400°C, but heating up the iron quickly is essential both for an acceptable handling experience as well as minimizing high temperature exposure and oxidisation of the soldering iron tip.
Additionally at least two programmable buttons for temperature presets is very useful. I also recommend using a dry cleaning sponge (Reinigungswolle) instead of a wet sponge, since this will minimise temperature loss and temperature strain on the solder tip. Please don't use wet sponges.
Product example: Toolcraft ST-100D SE from conrad.de, max. temp 450°C, 3 programmable buttons, 100W power, dry cleaner sponge (Reinigungswolle) included. Pricing ca. 130EUR (incl. MwSt, in 2023).
Soldering Tip
Personally I prefer small flat soldering tips over the typical rounded ones. If your soldering station comes with a fine enough soldering tip, you don't need to worry about buying additional tips.
The Toolcraft ST-100D station includes a fine tip (not pre-mounted) useful for most THT soldering jobs. For SMD soldering we ordered a flat tip for our student lab.
Product example: Lötspitze Meißelform TOOLCRAFT T-0,8D Spitzen-Größe 0.8 mm Spitzen-Länge 17 mm
Other Tools
I also recommend getting at least one PCB-holder ("Dritte Hand", a simple one without a magnifying glass is sufficient) and a good light source on a flexible stand/arm. They can also be bought as a combined tool ("Lupenleuchte").
Product example: Tisch-Lupenleuchte with pcb-holder from conrad.de
Plastic cutting mats can cause ESD damage to electronic components, which is why I advice against using one to protect your table surface. The cheapest option is to use a large piece of cardboard, or if you want to go fancy use a proper soldering mat.
Product example: Soldering mat (Lötablage) from conrad.de
Depending on your application some tweezers or special PCB-holders and flat pliers can be useful too. Here's a list of equipment we use in our student lab:
-
flat self-closing tweezers / flache Lötpinzette / flache Kreuzpinzette
-
Entlötlitze/Desoldering Braid (recommended) or Entlötpumpe/Desoldering Pump (causes mechanical stress, but is easier to handle for beginners)
Material Recommendations
Disclaimer: I focused on products by Stannol for my research for good products. There may be other useful products on the market.
Solder Wire
Solder wire with silver (Ag) component has a lower working temperature than without silver. The price is slightly higher but it's worth the cost.
Recommendation: Use 0.5mm diameter solder wire, useful not only for SMD but regular THT soldering.
Product example: Stannol HS10, 95.5% Sn, 3.8% Ag, 0.7% Cu (Sn95,5Ag3,8Cu0,7)
Alternatively the Stannol HF32 variant (Sn95,5Ag3,8Cu0,7) uses flux that is halogen-free and produces less smoke. It's worth noting the noticeable higher price and sticky residue it leaves behind. If health risks are a major concern, the HF32 wire can be recommended instead of HS10. However, I would recommend using safety goggles, since the flux tends to spray hot residue in the vicinity when heated.
Liquid Flux
Additionally for lead free soldering using additional liquid flux is essential for correcting mistakes or handling thicker wires. Thick wires require more time for heating up, which will burn through the flux included in the solder wire more quickly. Thus extra flux is required to be able to introduce enough heat.
I have found one liquid flux that is surprisingly low in toxicity but also works nicely with different solder wires that I tested. I recommend liquid flux with a brush included in the bottle cap.
Product example: Edsyn FL 112, VOC-free No-Clean rework flux.
How to Solder Lead Free, Step by Step Beginner-Guide
Soldering lead free is more difficult than with leaded solder wire, so following procedure more closely is essential for achieving good results. Leaded solder will allow for more user mistakes, lead-free solder however requires users to follow recommended steps more closely.
Step 0: Health & Safety Stuff
- When soldering, never touch your face, mouth, drinks or food. When done soldering wash your hands thoroughly with soap.
- If you have long hair tie it back. Hair on fire is a bad hairstyle.
- Leave a window open or better yet: leave the windows closed but use an air filter to filter out the soldering fumes. Fumes can sting your lungs and eyes, close your eyes and hold your breath if fumes touch your face.
- Regularly take breaks to open the windows and ventilate.
- If you use toxic flux, read the data sheet and use appropriate gloves and eye protection.
- Don't burn the cable of your soldering iron with the soldering iron ;-)
Step 1: Preparations
- Take time to prepare your PCB or soldering job before you switch on the solder iron.
- Program button 1 on your soldering station for standby temperature (150°-180°C).
- Program another button for your lead-free solder ideal working temperature (380°-395°C)
If you're using a different station or different solder you need to experiment to find the correct settings for your station. Be aware that lead-free solder without silver requires about 10°C higher temperatures, but the temperature should never exceed 400°C. I found that silver-free solder requires at least 390°C to be able to properly work with it. Lower temperatures are indeed possible but not advisable. You will run into problems if your temperature is too low.
Choosing a higher temperature however increases the oxidisation speed of your soldering iron tip as the flux will evaporate more quickly. Figuring out ideal temperature settings for your station is very difficult for beginners, so get yourself some help from an experienced soldering expert.
Lead-free soldering is more advanced than using leaded solder and not beginner friendly!
Using ideal temperature settings is essential for the lead-free soldering experience, but difficult for beginners to figure out. If you're struggling with soldering, come back to this step to reconsider your temperature settings!
Step 2: Tinning & Cleaning the Tip
Every(!!!) time you pick up the iron for soldering, you need to tin the tip first. Press your working temperature button (button 3 in my example). Wait for the tip to heat up, hold solder wire against the tip until it begins to melt. Cover the tip all around from all sides with solder.
Make sure the tin doesn't only sit on one side, rotate the tip while tinning.

Dip the tip into the dry cleaning sponge once(!!) to remove excess solder, do not thoroughly wipe the tip in the sponge and do not "clean off" the solder too well. The solder is actually good maintenance for the tip, wiping too much off creates microscopic scratches in the tip.
Your tip should be silvery shiny now. Do not wait, immediately start soldering. If you wait too long, you need to repeat this step before soldering. This is what a good soldering tip ready for work looks like:
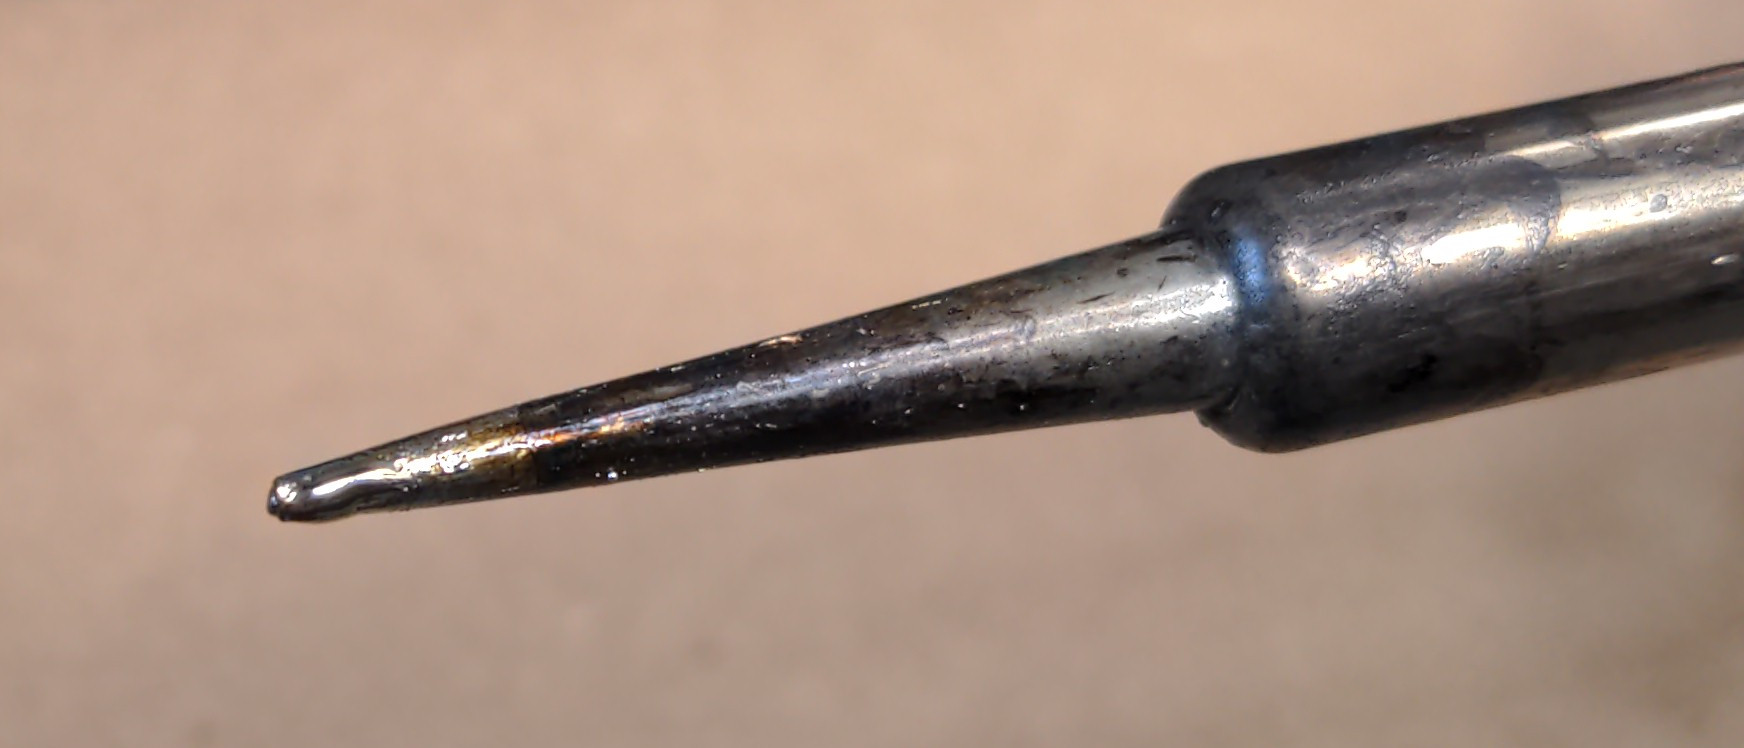
Your soldering iron tip must always(!!) look silvery and shiny when you begin soldering!
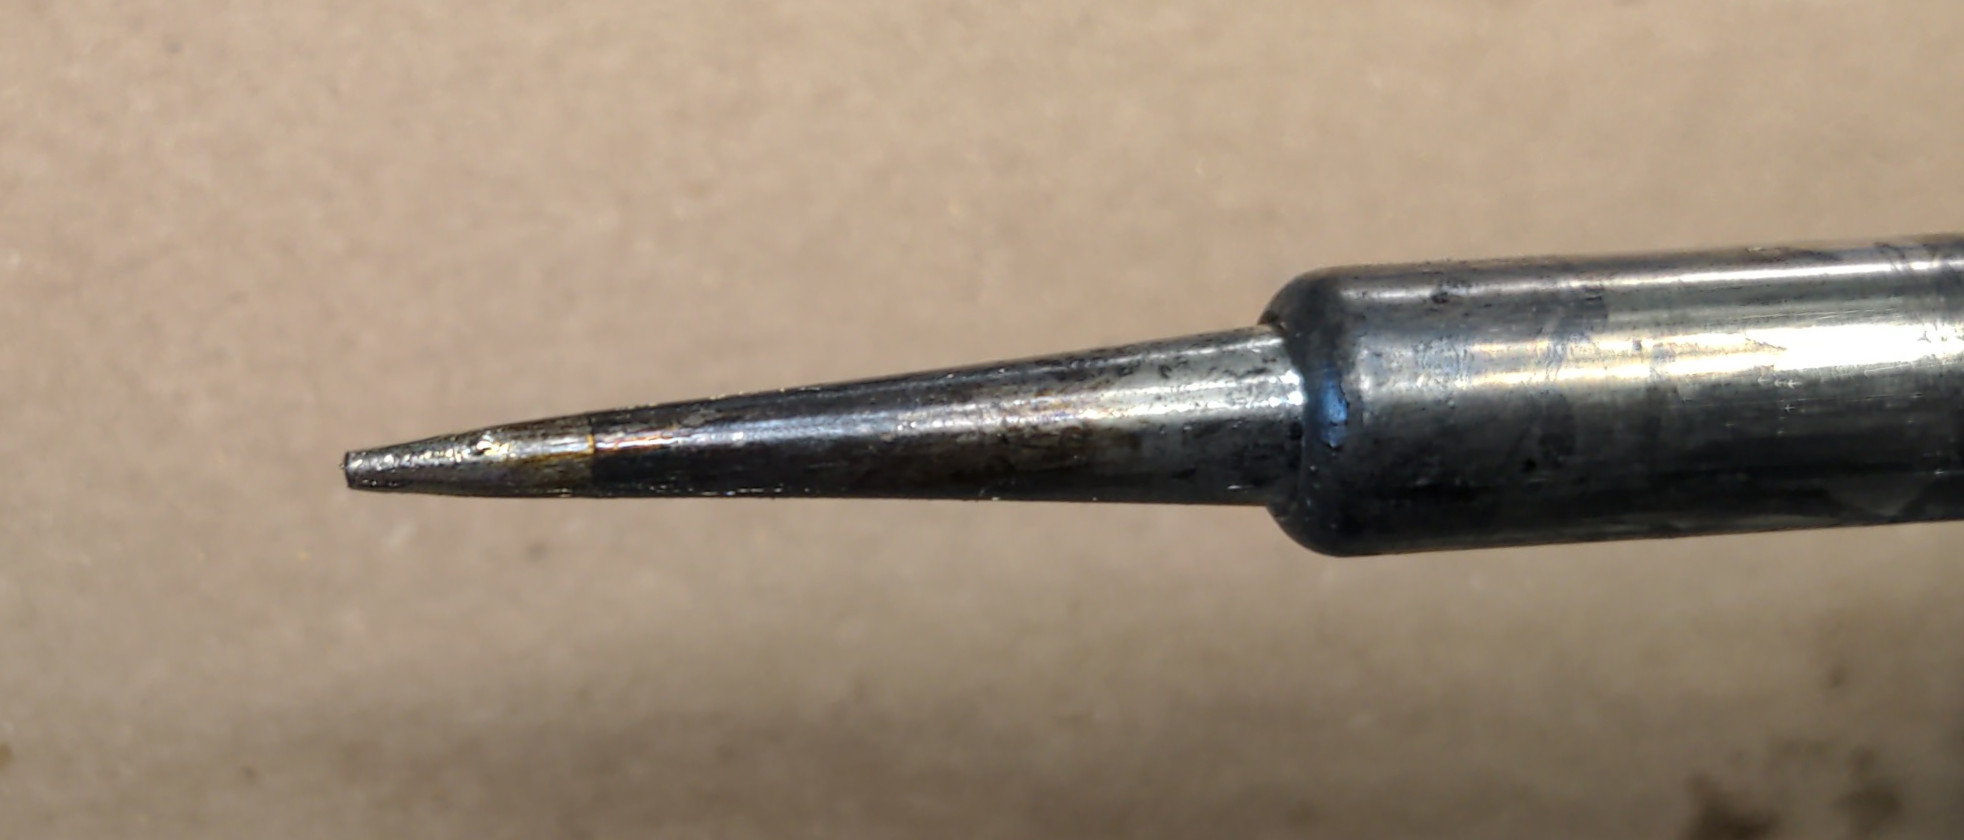
If your tip looks dull, dark, brown or black, you will not be able to solder. This layer is called oxidisation. Remove the oxidisation (aka "clean the tip") by applying new solder all around the tip and carefully removing excess solder using the dry cleaning sponge.
This is what an oxidised tip looks like:
Step 3: Preheating the Components
Place the tip of your iron onto the two (or multiple) components you want to solder together. Make sure the tip touches both components at the same time. Wait at least 3 seconds.
Step 4: Applying Solder
The tip remains where it is, with your other hand apply solder onto the "triangle" formed by the two metallic components and your soldering iron. Do not apply too sparsely. Especially when using thin solder wire (e.g. 0.5mm) it can feel like you need to apply lots of solder. Don't be too shy to apply more. This step roughly takes another 2-3 seconds.
Step 5: Wait for the Solder to Flow
Remove the solder wire but keep the iron in place. Wait yet another 2-3 seconds and watch the flux "bubble" and the solder melt and flow. Once the solder has begun to flow along the metallic components it is now safe to remove the iron.
If you skip this step you will create a "cold solder joint" (kalte Lötstelle), which means the solder wire has melted and sits on top of the metallic components, but it did not mechanically connect with them. Cold solder joints typically look dull and rugged, good solder joints are shiny and smooth.
Do not remove the iron too quickly. Wait for the solder to not only melt but also flow(!!).
Step 6: Continue Soldering or Use Standby Temperature
If you have more wires to immediately solder, repeat steps 3-5 for the next solder joint while your tip is still shiny. If, however, you need to go back to placing new parts on your PCB or want to take a break, press button 1 and set your iron to standy-temperature.
If you want to go back to soldering, repeat by going back to Step 2: set your working temperature, tin your tip, then begin soldering.
Step 7: Fixing Mistakes, Soldering Big or Oxidised Parts, Adding Flux
Because the working temperature of lead free solder is higher than with leaded solder, unfortunately the flux evaporates very quickly and is entirely gone by the time you want to fix and reheat a joint. Reheating joints will most likely not work.
To be able to reheat an existing joint, you have to apply more flux. You can do so by using liquid flux that can be applied using a brush. Simply dip some flux onto the joint and start pressing your (freshly tinned and shiny!) iron onto the joint. You will hear the flux sizzling and it might take quite some time until the heat from the iron is transferred into the joint. Be patient and wait for the joint to melt. Keep pressing the iron onto the joint (patience!). Wait for it to fully melt and be "flowy" (like in Step 5) before correcting your mistake.

Bigger components like thicker wires or more oxidised surfaces can also require extra flux to be applied. Apply the flux to the component you're struggling with, then hold the iron and solder against to the components or wire. Make sure to shortly remove the iron before applying more flux, you do not want to burn the brush with the iron. Work quickly though, do not let the components cool down too much.
I recommend using your main hand to hold the iron, and having the liquid flux ready with your off hand. Leave the bottle cap unscrewed loosely sitting on the bottle, ready to be grabbed with your off-hand, while keeping the iron to the join with your main hand. Be ready to occasionally apply more flux while continuously applying more heat with your iron. Sooner or later the material will be hot enough for the solder to begin "flowing" and mechanically connecting with the metallic parts.
Step 8: Removing Excess Solder
If you have applied too much solder, either for aesthetic reasons or functional reasons (short circuits to neighbouring joints or components), you have to reheat the joint using extra flux. Refer to Step 7 and use liquid flux to fully melt the solder and make it "flowy".
With leaded solder it used to be easy to simply "wipe" off excess solder after reheating it, simply using the tip of the soldering iron and wiping it off with a dry sponge. With lead free solder this method usually doesn't work any more. Use a desoldering pump ("Entlötpumpe", causes mechanical stress, but is easier to handle for beginners) or better yet desoldering braid ("Entlötlitze").
Using Desoldering Braid (Entlötlitze)
With your fingers pull the desoldering braid apart to create space in between the braid wires for the solder to flow into. Place the opened up braid onto the solder joint and apply liquid flux on top. Press your soldering iron onto the braid and on the joint until the solder begins to melt. Refer to Step 7 if you have trouble melting the solder.
Once the solder begins to flow, it will flow into the braid. Once you are happy with the removal you can remove the braid first(!) and then the iron, or remove both at the same time. If you remove the iron first the braid may cool down and get stuck to the joint and you will have to remelt it.
You can now reapply new solder or use more liquid flux to fix the solder joint.
Q&A Troubleshooting: Common Mistakes
If you have trouble soldering, make sure you haven't skipped a step. Unfortunately lead-frees soldering requires both more advanced equipment and advanced skills and knowledge to achieve good results. Here's a list of common mistakes:
Q: My solder joints look dull and not shiny!
A: A good solder joint using leaded solder should always look shiny. If it doesn't, it's a cold joint. For lead-free solder this isn't necessarily true any more. If your solder joint has been "flowy" and has shaped a concave and smooth looking joint, your solder joint is probably fine. However, I found that the lead free solder I use (and recommended above) produces shiny results indistinguishable from leaded solder. If your joint still looks dull you created a cold solder joint.
If you care about aesthetics, use good quality solder and don't apply too much heat. Work quickly but not too quick, wait for the solder to flow then remove the iron. If you overheat the solder beyond this point, you can cause heat damage to sensitive electronic components.
Q: I always create cold solder joints, the solder will not flow no matter what I do!
A: Probably you are not introducing enough heat into the joint/solder. There are multiple possible reasons for this:
a) Your temperature setting is too low, try readjusting your settings (see Step 1) and make sure your soldering station can provide the required heat. Do not use cheap equipment like an on/off soldering iron without temperature settings.
b) Your tip is oxidised (dull or dark) and cannot transfer the heat into the surfaces (fix your tip, Step 2).
c) Your flux evaporated too quickly (temperature too high? Step 1) or your solder wire does not include flux. Add extra flux to fix the problem (Step7) and/or add more solder wire to help the melting.
Solder Experiments and Research, Professional Guide
... ToDo ... work in progress :)
Pro Equipment
I've had excellent experiences and can recommend using Weller products for professional purposes. The setup I use is roughly 900EUR and includes the Weller products:
- station: WX2, ca. 650€
- iron: WXMP (12V, max. 55W), ca. 180€
- flat/chisel 1mm wide tip: RTM 013 S, ca. 25€
- safety rest with dry cleaner T0051512199N, ca. 45€
Contact
Questions? Problems? More pro tips? Feel free to contact me @merline on haecksen rocketchat or on DM me on mastodon.